There are some really good print driver installation guides for Intune like the one from Ben Whitmore (msendpointmgr) and Rudy Ooms (call4cloud). Their approach is to extract the driver from the installation package of the vendor, install it by using pnputil and then to run the Add-Printer PowerShell cmdlet with printer name (e.g. “Floor 1 printer”), Driver Name (“Kyocera Ecosys m8124cidn KX”) and IP address string (“IP_10.23.202.11″).
This will work for HP printers as well but it’s not a really smart approach since it’s difficult to extract the proper drivers and may lead to a limited functionality of the devices if you don’t install all of them. Therefore, here’s a description on how to automate the deployment based on the official HP admin guide (link). The steps below are for an Intune Win32 app but the approach for an MECM application would be very similar, all the PowerShell code can be used. I will split up the installation to two applications with one just containing the driver setup and the other the configuration. The configuration app has the first application set as requirement so that the driver package will be installed automatically. This allows a fast configuration of multiple printers (e.g. HP printer 1st floor, HP printer 2nd floor etc.) of the same model on a workstation.
With that said, let’s start the work:
1. Download the driver package from HP. In this example, we take the driver for the HP Color LaserJet Pro M282-M285 Multifunction Printer series (link)
2. Extract the exe to a subfolder (don’t run it).

3. Optional: Reduce the size of the setup. In the HP setup instructions, you find a cmd template for cleaning the content for an enterprise deployment.

4. Create an installation command and test it. For the supported parameters, see the msi property reference in the HP documentation (link)
Example 1:
msiexec.exe /i LM282x64.msi /qb ENTERPRISE=YES /l*v c:\windows\logs\HappyAdmin\lm282x64.log
Example 2:
msiexec.exe /i LM282x64.msi /qn ENTERPRISE=YES TRANSFORMS=LM282x64_1034.mst
I suggest to create an install.cmd and to put it in the installation sources

5. Use the Win32ContentPrepTool to create the .intunewin file.

6. In the Microsoft Endpoint Manager admin center, create a new Win32 app. Select the intunewin file we just created and provide the general information. Click Next.

7. Under Program, add the installation and uninstallation command. You find the UID for the uninstall under HKEY_LOCAL_MACHINE\SOFTWARE\Microsoft\Windows\CurrentVersion\Uninstall

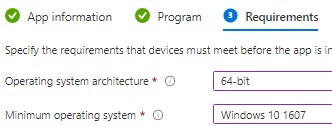
8. Under Requirements, select x64 and 1607
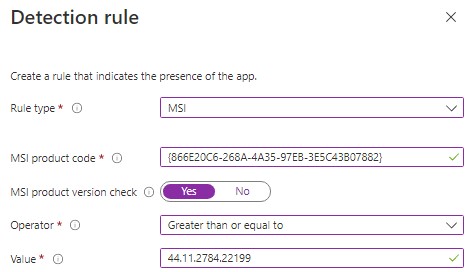
9. Select a manual detection rule
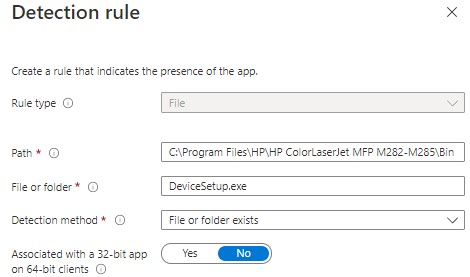
Optionally, you can check for the existence of DeviceSetup.exe in addition. It will be needed in the next step. In case it doesn’t exist, check you installation parameters.
10. Finish the wizard. Do not assign the app.
11. Now create another app for the configuration. We only need a script for the installation (install.ps1) and uninstallation (uninstall.ps1). Create the files from the example code below (modify the parameters).
Install.ps1
$IP = ‘10.23.202.11’
$Entry = “MFP Printer A4 Floor 1”
$RegPath = ‘HKLM:\SOFTWARE\HappyAdmin’
if(!(Test-Path -Path $RegPath)){New-Item $RegPath}
#LogPath of DeviceSetup.exe is c:\windows\system32\config\systemprofile\appdata\local\hp\atinstall
Set-ItemProperty -Path HKLM:\SOFTWARE\HappyAdmin -Name $Entry -Value $IP
$ArgList = ‘/networkaddress ‘ + $IP
Start-Process “C:\Program Files\HP\HP ColorLaserJet MFP M282-M285\Bin\DeviceSetup.exe” -ArgumentList $ArgList -Wait
Uninstall.ps1
$Entry = “MFP Drucker A4 Floor 1”
Remove-Printer $Entry
11. Create an intunewin file with the files you just created.

12. Create another win32 app in the Endpoint Manager console
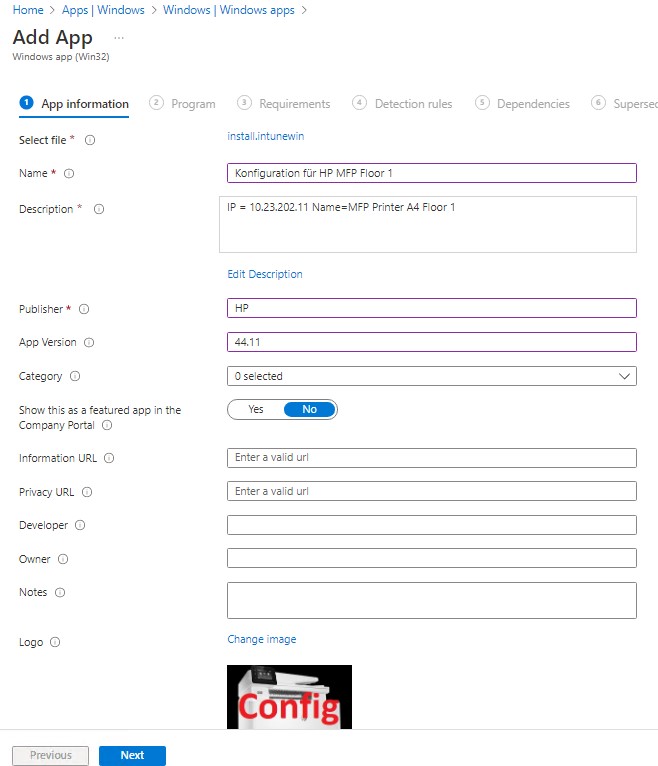
13. Under Program, enter the install and uninstall calls
C:\Windows\Sysnative\WindowsPowerShell\v1.0\powershell.exe -noprofile -executionpolicy Bypass -file .\install.ps1
C:\Windows\Sysnative\WindowsPowerShell\v1.0\powershell.exe -noprofile -executionpolicy Bypass -file .\uninstall.ps1

14. Under Requirements, select x64 and 1607
15. Under detection rules, enter
HKEY_LOCAL_MACHINE\SOFTWARE\Microsoft\Windows NT\CurrentVersion\Print\Printers plus the name of your printer. For the example above, the string is
HKEY_LOCAL_MACHINE\SOFTWARE\Microsoft\Windows NT\CurrentVersion\Print\Printers\MFP Printer A4 Floor 1
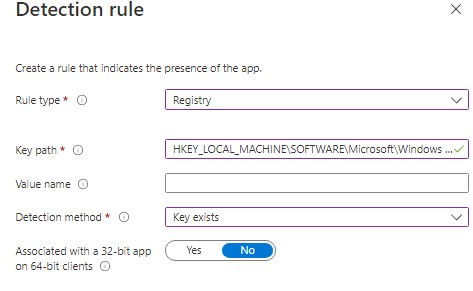
16. Under Dependencies, select the driver app that you created earlier

17. Assign the printer to your test group.
Important: The configuration will only succeed if the targeted machine can reach the printer. During the installation, SetupDevice.exe will try to connect to the printer. If it succeeds, the user will see a message in the lower right corner. If not, check C:\Windows\System32\config\systemprofile\AppData\Local\HP\AtInstall for logs. In the log below, you see that a connection to the printer failed.

To avoid helpdesk calls, consider suppressing notifications in case of required deployments.

Links:
HP Officejet Pro and Officejet Printers Series – IT Administrators Install Guide
http://h10032.www1.hp.com/ctg/Manual/c03809643
How to install Printer Drivers and Printers from Intune using Win32 apps and PowerShell
https://msendpointmgr.com/2022/01/03/install-network-printers-intune-win32apps-powershell/
What about Printer Drivers?
https://call4cloud.nl/2021/07/what-about-printer-drivers/
I hate HP Printer Software
https://www.reddit.com/r/sysadmin/comments/kb608y/i_hate_hp_printer_software_why_cant_i_just/
