
A common concern when introducing Autopilot are the limitations regarding the workstation name: Out-of-the-box, you only have these options:
- Use a prefix and a random number in the deployment profile

- Use a prefix and the serial number of the device
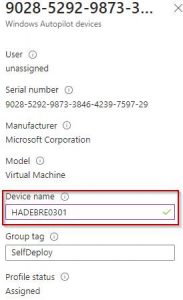
- Enter a fixed string in AutoPilot registered devices
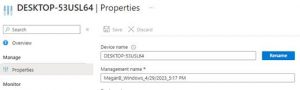
- Rename the device after the setup
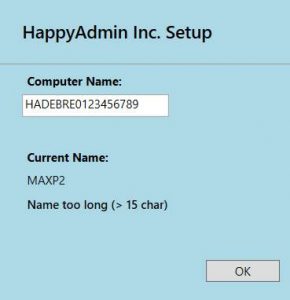
Organizations that use a complex naming schema are often looking for ways to overcome these limitations. The solution below is based on a script and gives you the full flexibility by prompting during or after the Autopilot setup. It checks the string length for NetBIOS naming compliance ( > 0 and <16 characters).
A typical usage scenario are cases where machines are set up by an IT supporter. Mind that the renaming operation requires a reboot which will not be enforced by the script.
Follow the step-by-step instructions to implement the solution in Intune.
- Download the sources from Github
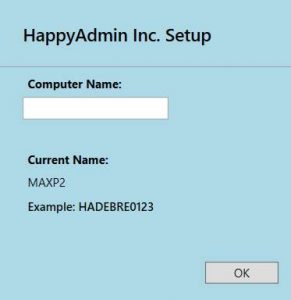
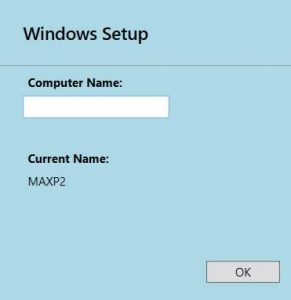
- Option A: Take the sources as-is and use the included intunewin file. The dialog will look like this:
Option B: Customize the script by adding your company name and an example name or any other instructions. To do so, modify lines 40 (Tooltip), 42 (Header) and Content (free text, e.g. example: HADEBRE0123)

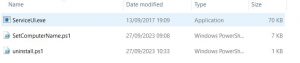
Create an intunewin file (see https://www.systemcenterdudes.com/deploy-microsoft-intune-win32-apps/ for intructions in case that you are not familiar with the process). You should place the 3 files in one folder when running IntuneWinAppUtil.exe:
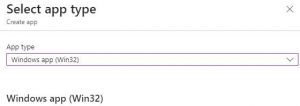
3. Set up a Win32 app in Intune
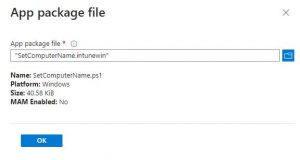
4. Upload the intunewin file from step 2 (either default or customized)
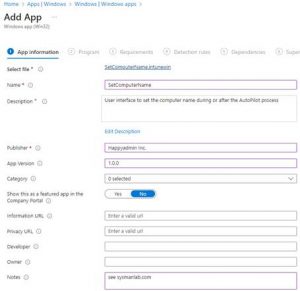
5. Set the App information
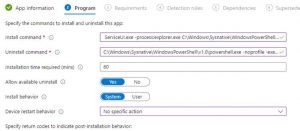
6. Enter the install/uninstall commands:
Install: ServiceUI.exe -process:explorer.exe C:\Windows\Sysnative\WindowsPowerShell\v1.0\powershell.exe -noprofile -executionpolicy Bypass -file .\SetComputerName.ps1
Uninstall: C:\Windows\Sysnative\WindowsPowerShell\v1.0\powershell.exe -noprofile -executionpolicy Bypass -file .\uninstall.ps1
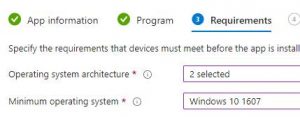
7. Enter the requirements:
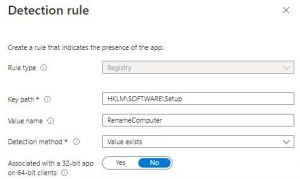
8. Enter the Detection Rule:
Rule type: Registry
Key Path: HKLM\SOFTWARE\Setup
Value name: RenameComputer
Detection Method: Value exists
Mind that this entry is of no importance for the renaming process, it is only used for the detection of a successful completion of the script.
9. Assign the script to any group that you want to test with.
You will see the dialog in front of a PowerShell console when running on a client.
Code:
#===========================================================================
# SetComputerNameDLG 1.0
# Last Updated: 10/01/2023
#
# This script provides a simple user interface for setting the PC Name
#===========================================================================

# Required to use XAML GUI components
[void][System.Reflection.Assembly]::LoadWithPartialName('presentationframework')

#===========================================================================
# Stores XAML for GUI in $xaml variable to be parsed and transposed into PS
#===========================================================================
$InputXAML = @"
<Window x:Name="MainWindow1" x:Class="DeploymentMenu.MainWindow"
xmlns="http://schemas.microsoft.com/winfx/2006/xaml/presentation"
xmlns:x="http://schemas.microsoft.com/winfx/2006/xaml"
xmlns:d="http://schemas.microsoft.com/expression/blend/2008"
xmlns:mc="http://schemas.openxmlformats.org/markup-compatibility/2006"
xmlns:local="clr-namespace:DeploymentMenu"
Title="Wowo Options" Height="310" Width="300" Topmost="True" WindowStartupLocation="CenterScreen" ResizeMode="NoResize" WindowStyle="None" Top="50">
<Grid x:Name="MainGrid">
<Grid.Background>
<LinearGradientBrush EndPoint="0.5,1" StartPoint="0.5,0">
<GradientStop Color="LightBlue" Offset="1"/>
<GradientStop Color="LightBlue"/>
</LinearGradientBrush>
</Grid.Background>
<Grid.ColumnDefinitions>
<ColumnDefinition Width="182*"/>
<ColumnDefinition Width="100*"/>
<ColumnDefinition Width="10*"/>
</Grid.ColumnDefinitions>
<Grid.RowDefinitions>
<RowDefinition Height="40*"/>
<RowDefinition Height="17*"/>
<RowDefinition Height="133*"/>
</Grid.RowDefinitions>
<TextBox x:Name="HostNameBox" HorizontalAlignment="Left" Height="23" Margin="25,7,0,0" TextWrapping="Wrap" VerticalAlignment="Top" Width="149" Grid.Row="2" ToolTip=""/>
<Label x:Name="PCNameLabel" Content="Computer Name:" HorizontalAlignment="Left" Margin="25,8,0,0" VerticalAlignment="Top" Width="108" Grid.Row="1" RenderTransformOrigin="0.566,-0.086" FontWeight="Bold" Height="26"/>
<TextBlock x:Name="MenuHeader" Margin="25,24,0,0" TextWrapping="Wrap" Text="Windows Setup" TextAlignment="Left" FontFamily="Segoe UI Semibold" FontSize="18" Grid.ColumnSpan="3" Width="280" VerticalAlignment="Top" HorizontalAlignment="Left" Height="34"/>
<Separator x:Name="TopBannerDivider" HorizontalAlignment="Left" Height="8" Margin="0" VerticalAlignment="Top" Width="300" Grid.Row="1" Grid.ColumnSpan="3"/>

<Button x:Name="BeginButton" Content="OK" HorizontalAlignment="Left" Margin="25,176,0,0" Grid.Row="2" VerticalAlignment="Top" Width="75" RenderTransformOrigin="-0.527,1.145" Grid.Column="1" Height="22"/>
<Label x:Name="CurrentNameLabel" Content="Current Name:" HorizontalAlignment="Left" Margin="25,58,0,0" VerticalAlignment="Top" Width="122" Grid.Row="2" FontWeight="Bold" Height="26"/>
<Label x:Name="CurrentName" Content="" HorizontalAlignment="Left" Margin="25,81,0,0" VerticalAlignment="Top" Width="149" Grid.Row="2" Height="26"/>
<Label x:Name="Message" Content="" HorizontalAlignment="Left" Margin="25,106,0,0" FontFamily="Segoe UI Semibold" VerticalAlignment="Top" Width="160" Grid.Row="2" Height="26"/>

</Grid>
</Window>
"@

#===========================================================================
# Parse XAML into Nodes to be converted into PowerShell objects
#===========================================================================

# Removes the Visual Studio class headers and "Name x:" prefixes to make the XML compatible
$InputXAML = $InputXAML -replace 'mc:Ignorable="d"','' -replace "x:N",'N' -replace '^<Win.*', '<Window'
[xml]$xaml = $InputXAML

# Reads XAML Nodes
$reader=(New-Object System.Xml.XmlNodeReader $xaml)

# Loads Parsed XAML into a .NET Form object container
$Form=[Windows.Markup.XamlReader]::Load( $reader )

#===========================================================================
# Store Form Objects In PowerShell
#===========================================================================

$xaml.SelectNodes("//*[@Name]") | %{Set-Variable -Name $($_.Name) -Value $Form.FindName($_.Name)}

#===========================================================================
# Initialization
#===========================================================================

$CurrentName.Content = $env:COMPUTERNAME
$LogFile = "c:\windows\Logs\SetComputerNameDLG.log"
"Starting SetComputerName.ps1" | Out-File -FilePath $LogFile

#===========================================================================
# Defines actions to take when clicking "OK"
#===========================================================================

$BeginButton.Add_Click(
{
$IsValidInput = $true

#NetBIOS computer names: Minimum name length 1 character. Maximum name length 15 characters

$PCName = $HostNameBox.Text
Write-Host $PCName

if($PCName.Length -gt 15){
$Message.Content = "Name too long (> 15 char)"
$IsValidInput = $false
}

if($PCName.Length -lt 1){
$Message.Content = "No Name set."
$IsValidInput = $false
}

if($IsValidInput){
$Form.Close()
Try{
#Rename-Computer -NewName $PCName -Force
"Succeeded to rename machine" | Out-File -FilePath $LogFile -Append
$registryPath = "HKLM:\SOFTWARE\Setup"
$valueName = "RenameComputer"
$valueData = $PCName

# Check if the registry key exists
if (Test-Path -Path $registryPath) {
# Registry key exists, so set the value
Set-ItemProperty -Path $registryPath -Name $valueName -Value $valueData
} else {
# Registry key doesn't exist, so create it and set the value
New-Item -Path $registryPath -Force
New-ItemProperty -Path $registryPath -Name $valueName -Value $valueData -PropertyType String
}

# Output a message to confirm the operation
"Registry key and value created/updated:"
"Key: $registryPath"
"Value Name: $valueName"
"Value Data: $valueData"
}
Catch
{
"Something went wrong: $_" | Out-File -FilePath $LogFile -Append
}
}
}
)

#===========================================================================
# Displays/Initiates GUI
#===========================================================================

# Displays the actual menu for user interaction
$Form.ShowDialog() | Out-Null
Links:
The different ways of (re)naming Windows 10 devices
https://www.petervanderwoude.nl/post/the-different-ways-of-renaming-windows-10-devices/
Ultimate guide to define device names in Windows Autopilot Hybrid Join Scenario
This works after enrollment.
But in enrrolment it wont pop up.
Is there any way to pop up during app installatsion in autopilot?.