AADApplicationProxyConnectorInstaller fails on Server 2022
Symptom: AADApplicationProxyConnectorInstaller fails. In the Application log of the EventLog, you find the error “Connector registration failed: Make sure you enabled Application Proxy in the Azure Management Portal. Error: ‘The remote name could not be resolved: ‘12345abc-xyzx-4567-8abc-2d1234aeee65.registration.msappproxy.net””
Cause: The issue seems to occur on Server 2022. Although 1909 isn’t supported either, the installation works fine under similar conditions.
Pocket Guide to Driver Import Links for MECM
This is just a collection of links that may help to save time when looking for drivers to be included in Microsoft Endpoint Configuration Manager. And a little assessment.
HP:
Matrix (manual download): https://hpia.hpcloud.hp.com/downloads/driverpackcatalog/HP_Driverpack_Matrix_x64.html
HP Plugin (HP Manageability Integration Kit): http://ftp.ext.hp.com//pub/caps-softpaq/cmit/HPMIK.html
Plugin Logs: Under %temp%, hpclient_DownloadImportDriverPack.log and others

5 stars for HP for their driver support solutions – comfortable, well structured, easy to find.
Dell:
Matrix (manual download): https://www.dell.com/support/kbdoc/000180534/dell-family-driver-packs
Plugin: https://www.dell.com/support/kbdoc/000178049/dell-command-integration-suite-for-system-center
Plugin log: c:\programdata\dell\commandintegrationsuite\ConfigManagerExtensions.Log
3 stars for Dell. The driver matrix is okay. There’s a plugin for MECM available, it’s frequently updated but less flexible than the HP solution (Example: You can’t set the paths for drivers and driver packages separately).
Lenovo:
Matrix (manual download): https://support.lenovo.com/us/en/solutions/ht074984-microsoft-system-center-configuration-manager-sccm-and-microsoft-deployment-toolkit-mdt-package-index
One star for Lenovo: No Win10/11 feature release specific links, the list is incomplete, no plugin for MECM.
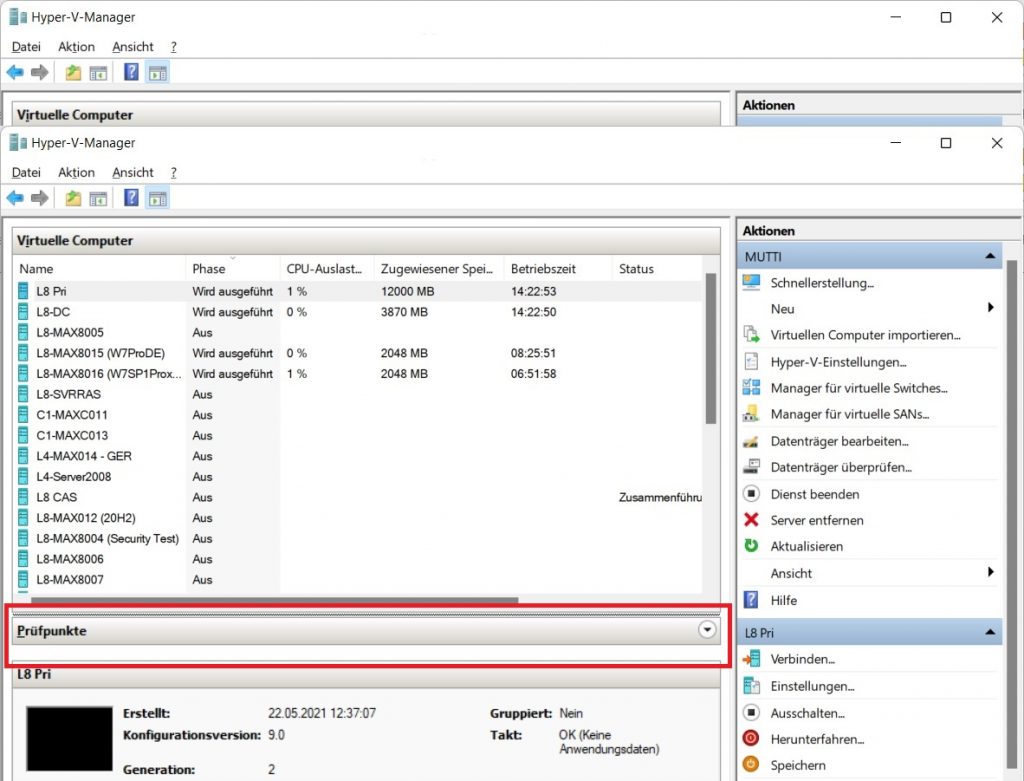
CheckPoints not visible in the Hyper-V console
It sometimes happens that I can’t get access to the Checkpoints that I created earlier in Hyper-V. Although I know they are there, the console doesn’t allow me to display them. Although the little arrow on the left points down, I don’t see the list of Checkpoints and the splitter window doesn’t allow me to increase the size of the field. This seems to be an issue that has to do with the saved screen position: When you display the console on an external display with a higher resolution you can see, mark the topmost Checkpoint and increase the field. Alternatively, you may succeed when the arrow points up and you mark a line that appears below the Checkpoint bar – it’s only visible with arrow up.
The second option to reveal them is PowerShell:
Get-VMSnapshot -VMName ‘Test-VM’ will display the Checkpoints, Remove-VMSnapShot can be used to delete them. It’s another pain point that snapshots have to be deleted to increase the disk size.
Links:
PowerShell cmdlets for Hyper-V:
https://docs.microsoft.com/en-us/powershell/module/hyper-v/?view=windowsserver2019-ps
Get Lenovo model information in MECM
Getting Lenovo model information in MECM requires some extra effort.
- Extend the hardware inventory to include Computer System Products (Win32_ComputerSystemProduct). The decisive entry is Version.
- Query the outcome when the inventory ran for some time, for example by SQL:
select v_R_System.Name0 as Name, v_GS_COMPUTER_SYSTEM_PRODUCT.Version0 as VersionOrModel, v_GS_COMPUTER_SYSTEM_PRODUCT.IdentifyingNumber0, v_GS_COMPUTER_SYSTEM_PRODUCT.Name0 as Model
from v_R_System inner join v_GS_COMPUTER_SYSTEM_PRODUCT on v_GS_COMPUTER_SYSTEM_PRODUCT.
select Version0, COUNT(*) AS Count
from
v_GS_COMPUTER_SYSTEM_PRODUCT
GROUP BY Version0
order by Count desc
Links:
Configuration Manager – Getting Lenovo Model Information
https://azurecloudai.blog/2021/01/12/configuration-manager-getting-lenovo-model-information/
How to run a setup silently that brings up a popup message at the end?
Sometimes setups bring up message boxes although you set all switches that promise to run them silently. Nutri Box (Nutri) belongs to that category. At the end of the installation, it shows a message that a restart and logon with admin rights is required to complete the installation. It doesn’t care about the VERYSILENT and SUPPRESSMSGBOXES switches since a registration of (fairly old) ocx files is required. Interestingly, this can be done without restart.
The solution for this category of problems is to implement a loop and to terminate the setup.exe when it has written a success message to the installation log. In the case below it is Installation process succeeded. Btw, thanks to Janik Vonrotz who provided the logging function.
# Setup for NutriBox (NutriPlus)

function Write-log
{

[CmdletBinding()]
Param(
[parameter(Mandatory=$true)]
[String]$Path,

[parameter(Mandatory=$true)]
[String]$Message,

[parameter(Mandatory=$true)]
[String]$Component,

[Parameter(Mandatory=$true)]
[ValidateSet("Info", "Warning", "Error")]
[String]$Type
)

switch ($Type) {
"Info" { [int]$Type = 1 }
"Warning" { [int]$Type = 2 }
"Error" { [int]$Type = 3 }
}

# Create a log entry
$Content = "<![LOG[$Message]LOG]!>" +`
"<time=`"$(Get-Date -Format "HH:mm:ss.ffffff")`" " +`
"date=`"$(Get-Date -Format "M-d-yyyy")`" " +`
"component=`"$Component`" " +`
"context=`"$([System.Security.Principal.WindowsIdentity]::GetCurrent().Name)`" " +`
"type=`"$Type`" " +`
"thread=`"$([Threading.Thread]::CurrentThread.ManagedThreadId)`" " +`
"file=`"`">"

# Write the line to the log file
Add-Content -Path $Path -Value $Content
}
#---------------Script start here--------------------------------------------------------------------------------------------

$scriptPath = split-path -parent $MyInvocation.MyCommand.Definition
$setupPath = $scriptPath + "\setup.exe"
$logPath = $env:PROGRAMDATA + '\BA'
$logFile = $logPath + "\NutriBox5.5.log"

if((Test-Path -Path 'C:\Program Files (x86)\nutri_box') -ne $false) #remove any previous installation and log
{
Write-log -Path $logFile -Message 'Silently removing existing installation in C:\Program Files (x86)\nutri' -Type Info -Component 'Main';
Start-Process -FilePath "C:\Program Files (x86)\Nutri_Box\unins000.exe" -ArgumentList "/VERYSILENT /SUPPRESSMSGBOXES /NORESTART /LOG=$logFile"
Remove-Item -Path $logFile -Force
}

if((Test-Path $logPath) -ne $true) { md $logPath}

Write-log -Path $logFile -Message 'Starting setup' -Type Info -Component 'Main';
Try{
Start-Process -FilePath $setupPath -ArgumentList "/VERYSILENT /SUPPRESSMSGBOXES /NORESTART /LOG=$logFile" #start setup without -wait switch so that the script continues
}
Catch
{
Write-log -Path $logFile -Message 'Setup failed' -Type Error -Component 'Main';
}

Start-Sleep -Seconds 5 #Give the setup 5 sec to start
$success = $false
$count = 0
while($count -le 100)
{
$res = Select-String -Path $logFile -Pattern 'Installation process succeeded' -quiet
if($res -eq $true)
{
$Msg = 'Found string Installation Process Succeeded in log - ' + $count + ' seconds passed since start.'
Write-log -Path $logFile -Message $Msg -Type Info -Component 'Main'
taskkill /F /IM 'setup.exe'
taskkill /F /IM 'setup.tmp'
$success = $true
break;
}

$count++
Start-Sleep -Seconds 1
}

if($success)
{
$Msg = 'Setup completed after ' + [string]$Count + ' seconds'
Write-log -Path $logFile -Message $Msg -Type Info -Component 'Main'
}

Write-log -Path $logFile -Message 'Starting ocx registration' -Type Info -Component 'Main'

if((Test-Path C:/Windows/SysWOW64/RICHTX32.ocx) -eq $true) {
regsvr32 /s C:/Windows/SysWOW64/RICHTX32.ocx
}
else {
Write-log -Path $logFile -Message 'C:/Windows/SysWOW64/RICHTX32.ocx not found - skipping' -Type Info -Component 'Main'
}

Write-log -Path $logFile -Message 'Running regsvr32 /s C:/Windows/SysWOW64/MSCOMCTL.ocx' -Type Info -Component 'Main'
regsvr32 /s C:/Windows/SysWOW64/MSCOMCTL.ocx
Write-log -Path $logFile -Message 'Running regsvr32 /s C:/Windows/SysWOW64/MSCOMCT2.ocx' -Type Info -Component 'Main'
regsvr32 /s C:/Windows/SysWOW64/MSCOMCT2.ocx
Write-log -Path $logFile -Message 'Running regsvr32 /s C:/Windows/SysWOW64/msmask32.ocx' -Type Info -Component 'Main'
regsvr32 /s C:/Windows/SysWOW64/msmask32.ocx
Write-log -Path $logFile -Message 'Running regsvr32 /s C:/Windows/SysWOW64/vsflex7l.ocx' -Type Info -Component 'Main'
regsvr32 /s C:/Windows/SysWOW64/vsflex7l.ocx
Write-log -Path $logFile -Message 'Running regsvr32 /s C:/Windows/SysWOW64/TABCTL32.ocx' -Type Info -Component 'Main'
regsvr32 /s C:/Windows/SysWOW64/TABCTL32.ocx
Write-log -Path $logFile -Message 'Running regsvr32 /s C:/Windows/SysWOW64VSPRINT7.ocx' -Type Info -Component 'Main'
regsvr32 /s C:/Windows/SysWOW64/VSPRINT7.ocx
Write-log -Path $logFile -Message 'Running regsvr32 /s C:/Windows/SysWOW64/MSCOMM32.ocx' -Type Info -Component 'Main'
regsvr32 /s C:/Windows/SysWOW64/MSCOMM32.ocx
Write-log -Path $logFile -Message 'Running regsvr32 /s C:/Windows/SysWOW64/MSSTDFMT.dll' -Type Info -Component 'Main'
regsvr32 /s C:/Windows/SysWOW64/MSSTDFMT.dll

Write-log -Path $logFile -Message 'Job done'
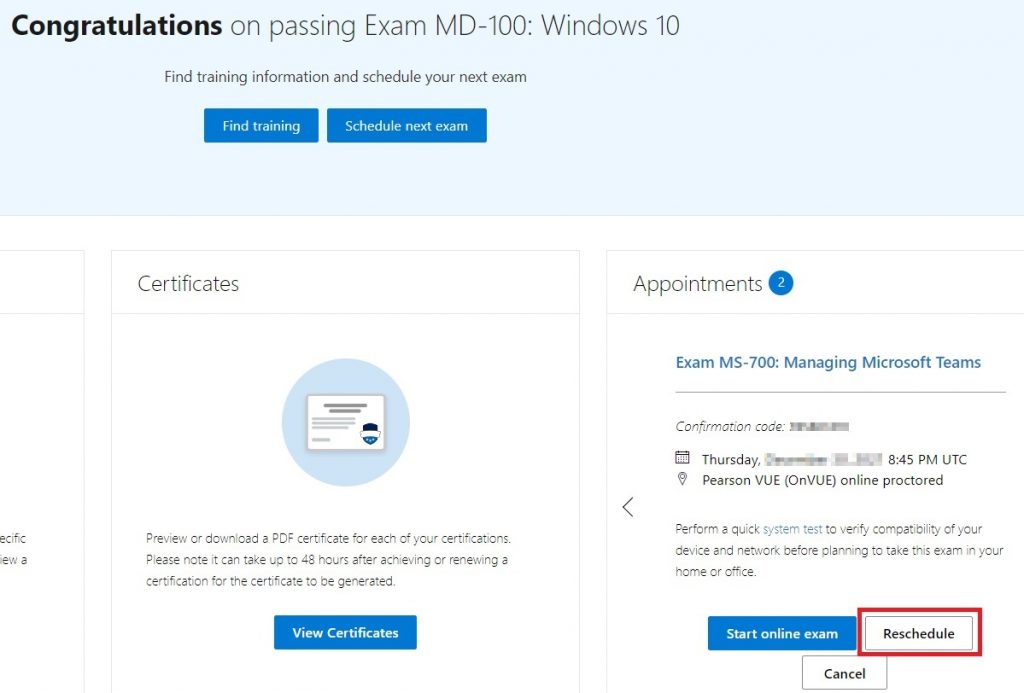
Reschedule a Pearson VUE exam
Since I always struggle when I have to reschedule a Pearson VUE exam (the support pages are a maze), here’s a short description which hopefully helps others and my bad memory.
Open https://www.microsoft.com/en-us/learning/dashboard.aspx
Log on with your Microsoft account.
You probably have to scroll a bit down to find the Appointment field and the Reschedule button.