
Application Guard came with the 1709 release of Windows 10 to make internet browsing more secure. The Edge browser is running in a hidden virtual machine that is built from the OS files of your physical machine and that has a limited life time: When the user logs off, the machine gets deleted. The level of permitted interactions between the host and the application guard session can be set by GPO (Computer Configuration->Administrative Templates->Windows Components->Windows Defender Application Guard) or SCCM (Assets and Compliance\Overview\Endpoint Protection\Windows Defender Application Guard).
There are two modes: In standalone mode the user can chose whether or not to use Application Guard, in Enterprise mode it gets enforced on any untrusted sites. I don’t want to discuss the pros and cons of both modes but Enterprise mode will probably lead to unacceptable restrictions on most regular office machines. It may change in the future, but currently there’s no way to save cookies and plugins are not supported either. Nonetheless, it’s a perfect option for kiosk PCs, production and monitoring machines etc.
Let’s look at the manual configuration – it’s fairly easy:
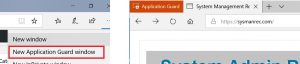
Open Control Panel->Programs and Features (appwiz.cpl), click on Turn Windows feaures on or off and activate Hyper-V and Windows Defender Application Guard. Afterwards, restart the machine and you’ll have an additional option in Edge above New InPrivate Window:
Here’ a guide for the automated configuration by SCCM (or any other deployment software):
Option 1: SCCM Package
Place the following script in a text file and rename it to EnableApplicationGuard.ps1
Enable-WindowsOptionalFeature -Online -FeatureName Windows-Defender-ApplicationGuard -NoRestart | out-file “c:\[Your log path]\EnableApplicationGuard.log”
Enable-WindowsOptionalFeature -Online -FeatureName Microsoft-Hyper-V-All -NoRestart | out-file “c:\[Your log path]\EnableApplicationGuard.log” -append
#Remove Hyper-V tools (they are not required)
Disable-WindowsOptionalFeature -Online -FeatureName Microsoft-Hyper-V-Tools-All -NoRestart | out-file “c:\[Your log path]\EnableApplicationGuard.log” -Append
#optional
Get-WindowsOptionalFeature -online -FeatureName Windows-Defender-ApplicationGuard | out-file “c:\[Your log path]\EnableApplicationGuard.log” -Append
Get-WindowsOptionalFeature -online -FeatureName *Hyper-V* | out-file “c:\[Your log path]\EnableApplicationGuard.log” -Append
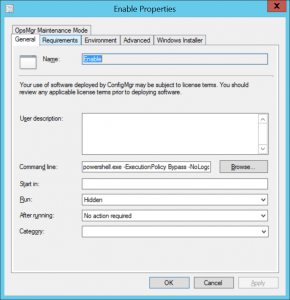
If you call the code from a task sequence, you can use the option Run Powershell Script. For a regular package deployment, use the following Program call:
powershell.exe -ExecutionPolicy Bypass -NoLogo -NonInteractive -NoProfile -WindowStyle Hidden -File .\EnableApplicationGuard.ps1
Option 2: SCCM Application
Using an application is more beautiful since a regular check of the setting is run. It also includes an uninstallation option.
The installation call is the same as for the package. Additionally, you need to provide an uninstallation script which I called DisableApplicationGuard.ps1:
Disable-WindowsOptionalFeature -Online -FeatureName Windows-Defender-ApplicationGuard -NoRestart | out-file “c:\[Your log path]\DisableApplicationGuard.log”
Disable-WindowsOptionalFeature -Online -FeatureName Microsoft-Hyper-V-All -NoRestart | out-file “c:\[Your log path]\DisableApplicationGuard.log” -append
#optional
Get-WindowsOptionalFeature -online -FeatureName Windows-Defender-ApplicationGuard | out-file “c:\[Your log path]\DisableApplicationGuard.log” -Append
Get-WindowsOptionalFeature -online -FeatureName *Hyper-V* | out-file “c:\[Your log path]\DisableApplicationGuard.log” -Append
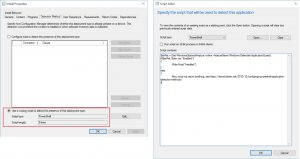
Enter the following code lines on the Detection Method tab:
$strRet = (Get-WindowsOptionalFeature -online -FeatureName Windows-Defender-ApplicationGuard)
if($strRet.State -eq “Enabled”)
{
Write-Host(“Installed”)
}
else
{
#you must not return anything, see https://david-obrien.net/2013/12/configmgr-powershell-application-detection-methods/
}
If you want to simplify your life, you may just download the application and import it:
Mind that you have to modify the log paths in the scripts!
Two final remarks:
• The configuration requires of course a reboot. The Application initiates a soft reboot. Remove this if you want to avoid any disturbance of the user or if you use it in a task sequence.
• When creating a target collection, mind that you have to limit it to Windows 10 1709 and later since earlier versions don’t support the feature.
Links:
MS documentation: https://docs.microsoft.com/en-us/windows/security/threat-protection/windows-defender-application-guard/wd-app-guard-overview
MS blog: https://blogs.windows.com/msedgedev/2016/09/27/application-guard-microsoft-edge/#Wi8WPmDbMbddXIR2.97
Symantec’s view: Close but no cigar: Microsoft Edge built – In Isolation
Bromium’s view: https://blogs.bromium.com/browser-isolation-with-microsoft-windows-defender-application-guard/